Permanently root a device by patching the boot partition
Dangerous
KaiOS 2.5
- Applies to
- Nokia 8000 4G (nokia-sparkler),
Nokia 6300 4G (nokia-leo),
Nokia 2720 Flip (nokia-beatles, build no. 30.00.17.05 and later),
Nokia 800 Tough (nokia-coconut, build no. 30.00.17.05 and later),
Alcatel Go Flip 3/SMARTFLIP (alcatel-4052, all carrier variants) - For other Qualcomm-based and Spreadtrum-based devices, see Devices with Qualcomm or Spreadtrum chipset.
On devices running KaiOS 2.5.4, such as the Nokia 6300 4G and Nokia 8000 4G, you might have noticed that although ADB and DevTools allow you to sideload most apps outside of KaiStore, apps requiring permissions such as embed-apps, embed-widget or engmode-extension (as defined by the devtools.apps.forbidden-permissions Device Preference flag) are not allowed.
If you try to install an app with any of such ‘forbidden’ permissions, WebIDE and gdeploy will throw an error:
~/Downloads/gdeploy$ gdeploy install ../wallace-toolbox/
GDEPLOY
-------
installationFailed: Installing apps with any of these permissions is forbidden: embed-apps,engmode-extension,embed-widgets
    at /home/bananahackers/Downloads/gdeploy/node_modules/node-firefox-connect/node_modules/firefox-client/lib/client-methods.js:70:19
    at Client.handleMessage (/home/bananahackers/Downloads/gdeploy/node_modules/node-firefox-connect/node_modules/firefox-client/lib/client.js:161:7)
    at Client.readMessage (/home/bananahackers/Downloads/gdeploy/node_modules/node-firefox-connect/node_modules/firefox-client/lib/client.js:220:10)
    at Client.onData (/home/bananahackers/Downloads/gdeploy/node_modules/node-firefox-connect/node_modules/firefox-client/lib/client.js:186:16)
    at Socket.emit (events.js:314:20)
    at addChunk (_stream_readable.js:297:12)
    at readableAddChunk (_stream_readable.js:272:9)
    at Socket.Readable.push (_stream_readable.js:213:10)
    at TCP.onStreamRead (internal/stream_base_commons.js:188:23)
On KaiOS 2.5.2 devices, the situation is worse as you cannot connect to DevTools at all.
Additionally, if you were to make any changes to the system, they would be reverted once you restart your device. This may prevent you from sideloading and using BananaHackers’ apps such as Wallace Toolbox, telnetd or ADBroot, which depend on those permissions to gain deeper system control.
Because in order for voice calls in WhatsApp to securely work, a kernel security module called SELinux is now set to Enforcing mode on user build. In Enforcing mode, SELinux actively checks for, and denies any system modifications, whether done by the user or system, which aren’t permitted in its predefined set of rules; this includes executing any commands as root. On the other hand, Permissive mode tells SELinux to only log but allow any prohibited modifications in the ruleset.
In this guide, you will go through the process of editing the boot partition where SELinux resides, setting it to Permissive mode, and changing certain boot flags to allow full debugging access.
Do set aside enough time for yourself to complete this guide; this will take around 30 minutes to an hour.
Proceeding with this guide will set SELinux to Permissive mode, which in turn disables voice calls in WhatsApp, and may prevent you from receiving incremental over-the-air updates. If you keep a copy of the original boot image, you can overwrite the modified partition and revert all changes, which I will cover in the last portion of the guide. But you may still permanently brick your phone if you make any mistake in the process.
Be sure to back up your data before proceeding.
It’s worth noting that in many situations, you don’t have to root your phone to remove preinstalled apps or change system settings, e.g. you can use this fork of Luxferre’s AppBuster to hide preinstalled apps from the launcher, instead of deleting them with Wallace Toolbox. You can also install CrossTweak, a Wallace Toolbox alternative that does not need
engmode-extensionand thus can be used on KaiOS 2.5.4 phones.
What we need
- a Nokia 6300 4G (excl. TA-1324), Nokia 8000 4G, Nokia 2720 Flip, Nokia 800 Tough or an Alcatel Go Flip 3/SMARTFLIP;
- a physical computer with working Internet connection, which you have administrator privileges;
- Setting up on a virtual machine, unless you can forward the USB connection of the device to the VM, is not encouraged.
- a USB cable capable of data transfer (EDL cables should also work);
- EDL loader for your phone: 6300 4G and 8000 4G, 2720 Flip, 800 Tough, or Go Flip 3 (AT&T/Cricket, T-Mobile/Metro/Rogers);
- edl.py to read and write system partitions in EDL mode:
- on the 6300 4G and 8000 4G: bkerler’s edl.py
- on the 2720 Flip, 800 Tough and Go Flip 3: andybalholm’s fork of bkerler’s edl.py
- QFIL or Qualcomm Product Support Tools (QPST) won’t be covered in this guide, however you can use those tools if you’re more comfortable with them.
Because of the differences in the partition table formats between the newer Qualcomm 205 Mobile Platform (MSM8905) and the Qualcomm Snapdragon 210 (MSM8909), using bkerler’s edl.py on devices with the MSM8905 chipset or andybalholm’s fork of edl.py on devices with the MSM8909 chipset may cause errors like
AttributeError: 'gpt' object has no attribute 'partentries'. Did you mean: 'num_part_entries'?orTraceback (most recent call last): File "/home/bananahackers/Downloads/edl/./edl", line 409, in <module> base.run() File "/home/bananahackers/Downloads/edl/./edl", line 398, in run if self.fh.connect(sahara): ^^^^^^^^^^^^^^^^^^^^^^^ File "/home/bananahackers/Downloads/edl/edlclient/Library/firehose_client.py", line 114, in connect if self.firehose.configure(0): ^^^^^^^^^^^^^^^^^^^^^^^^^^ File "/home/bananahackers/Downloads/edl/edlclient/Library/firehose.py", line 1017, in configure rsp = self.cmd_read_buffer(0, 1, 1, False) ^^^^^^^^^^^^^^^^^^^^^^^^^^^^^^^^^^^^ File "/home/bananahackers/Downloads/edl/edlclient/Library/firehose.py", line 710, in cmd_read_buffer if "value" in rsp.data and rsp.data["value"] == "NAK": ^^^^^^^^^^^^^^^^^^^ TypeError: a bytes-like object is required, not 'str'For the sake of convenience, move the MBN file to the root of the
edl-masterfolder. If you need to have the file in another folder, change the directory path for each command in this guide accordingly. - Python 3 and
pipfor edl.py to work; setup guides can be found for each operating system below- Python 2.7 bundled with macOS 10.8 to 12 is NOT recommended for following this guide.
- tip: On macOS and Linux, you can use Homebrew or your package manager of choice to set up Python, ADB,
libusband dependencies for edl.py.
Windows users using andybalholm’s edl.py also need to download and install:
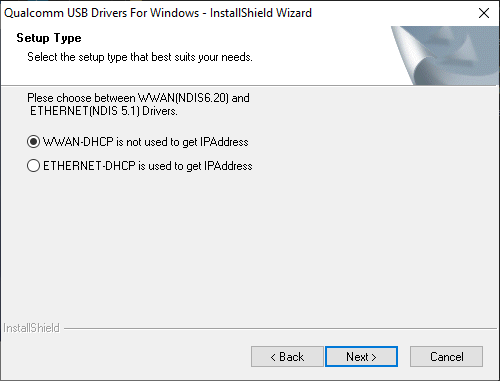
- Qualcomm driver for your computer to see the phone in EDL mode (included under the Drivers folder);
- latest version of Zadig to configure
libusb-win32/libusb0driver; do NOT use the older version bundled in the repository as it has less chance of success
If you’re going the Automatic patching with 8k-boot-patcher route (recommended for more recent computers):
- Git to clone/download the repository of the patcher tool to your computer;
- Docker Compose to provide the environment for the patcher tool to work (included in Docker Desktop)
- Windows: 2nd version of Windows Subsystem for Linux with Linux kernel update package installed (to install WSL2, turn on VT-x virtualization in BIOS, then open Command Prompt with administrative rights and run
wsl --install)
If you’re going the Manual patching with Android Image Kitchen route:
- Android Image Kitchen version 3.8 (Windows, macOS/Linux)
- on Windows 10 pre-1809 and older versions of Windows: Notepad++ to edit files while preserving line endings
- (optional) Java Runtime Environment to properly sign the boot image with AVBv1
Part 1: Setting up the environment for edl.py
Linux
#indicates the command must be run with elevated rights. Replace#with whatever command your system uses for elevated privileges (sudo,doas,pkexec,su -cetc.)
Open a shell prompt and install the latest version of Python 3, pip, ADB and Git from your package manager of choice, then install the dependencies for edl.py from PyPI:
- Debian/Ubuntu-based distros:
# apt install python3 python3-pip python3-venv android-sdk-platform-tools git liblzma - Fedora, CentOS, RHEL:
# dnf install python3 python3-pip python3-virtualenv android-tools git xz - Arch-based distros:
# pacman -S python python-pip android-tools git xz - Gentoo:
# emerge -aq dev-util/android-tools dev-vcs/git dev-python/pip
Clone/download the content of bkerler’s EDL or andybalholm’s EDL tool repository, depending on your device:
- bkerler’s EDL:
git clone https://github.com/bkerler/edl.git && cd edl && \ git submodule update --init --recursive - andybalholm’s EDL:
git clone https://github.com/andybalholm/edl.git && cd edl
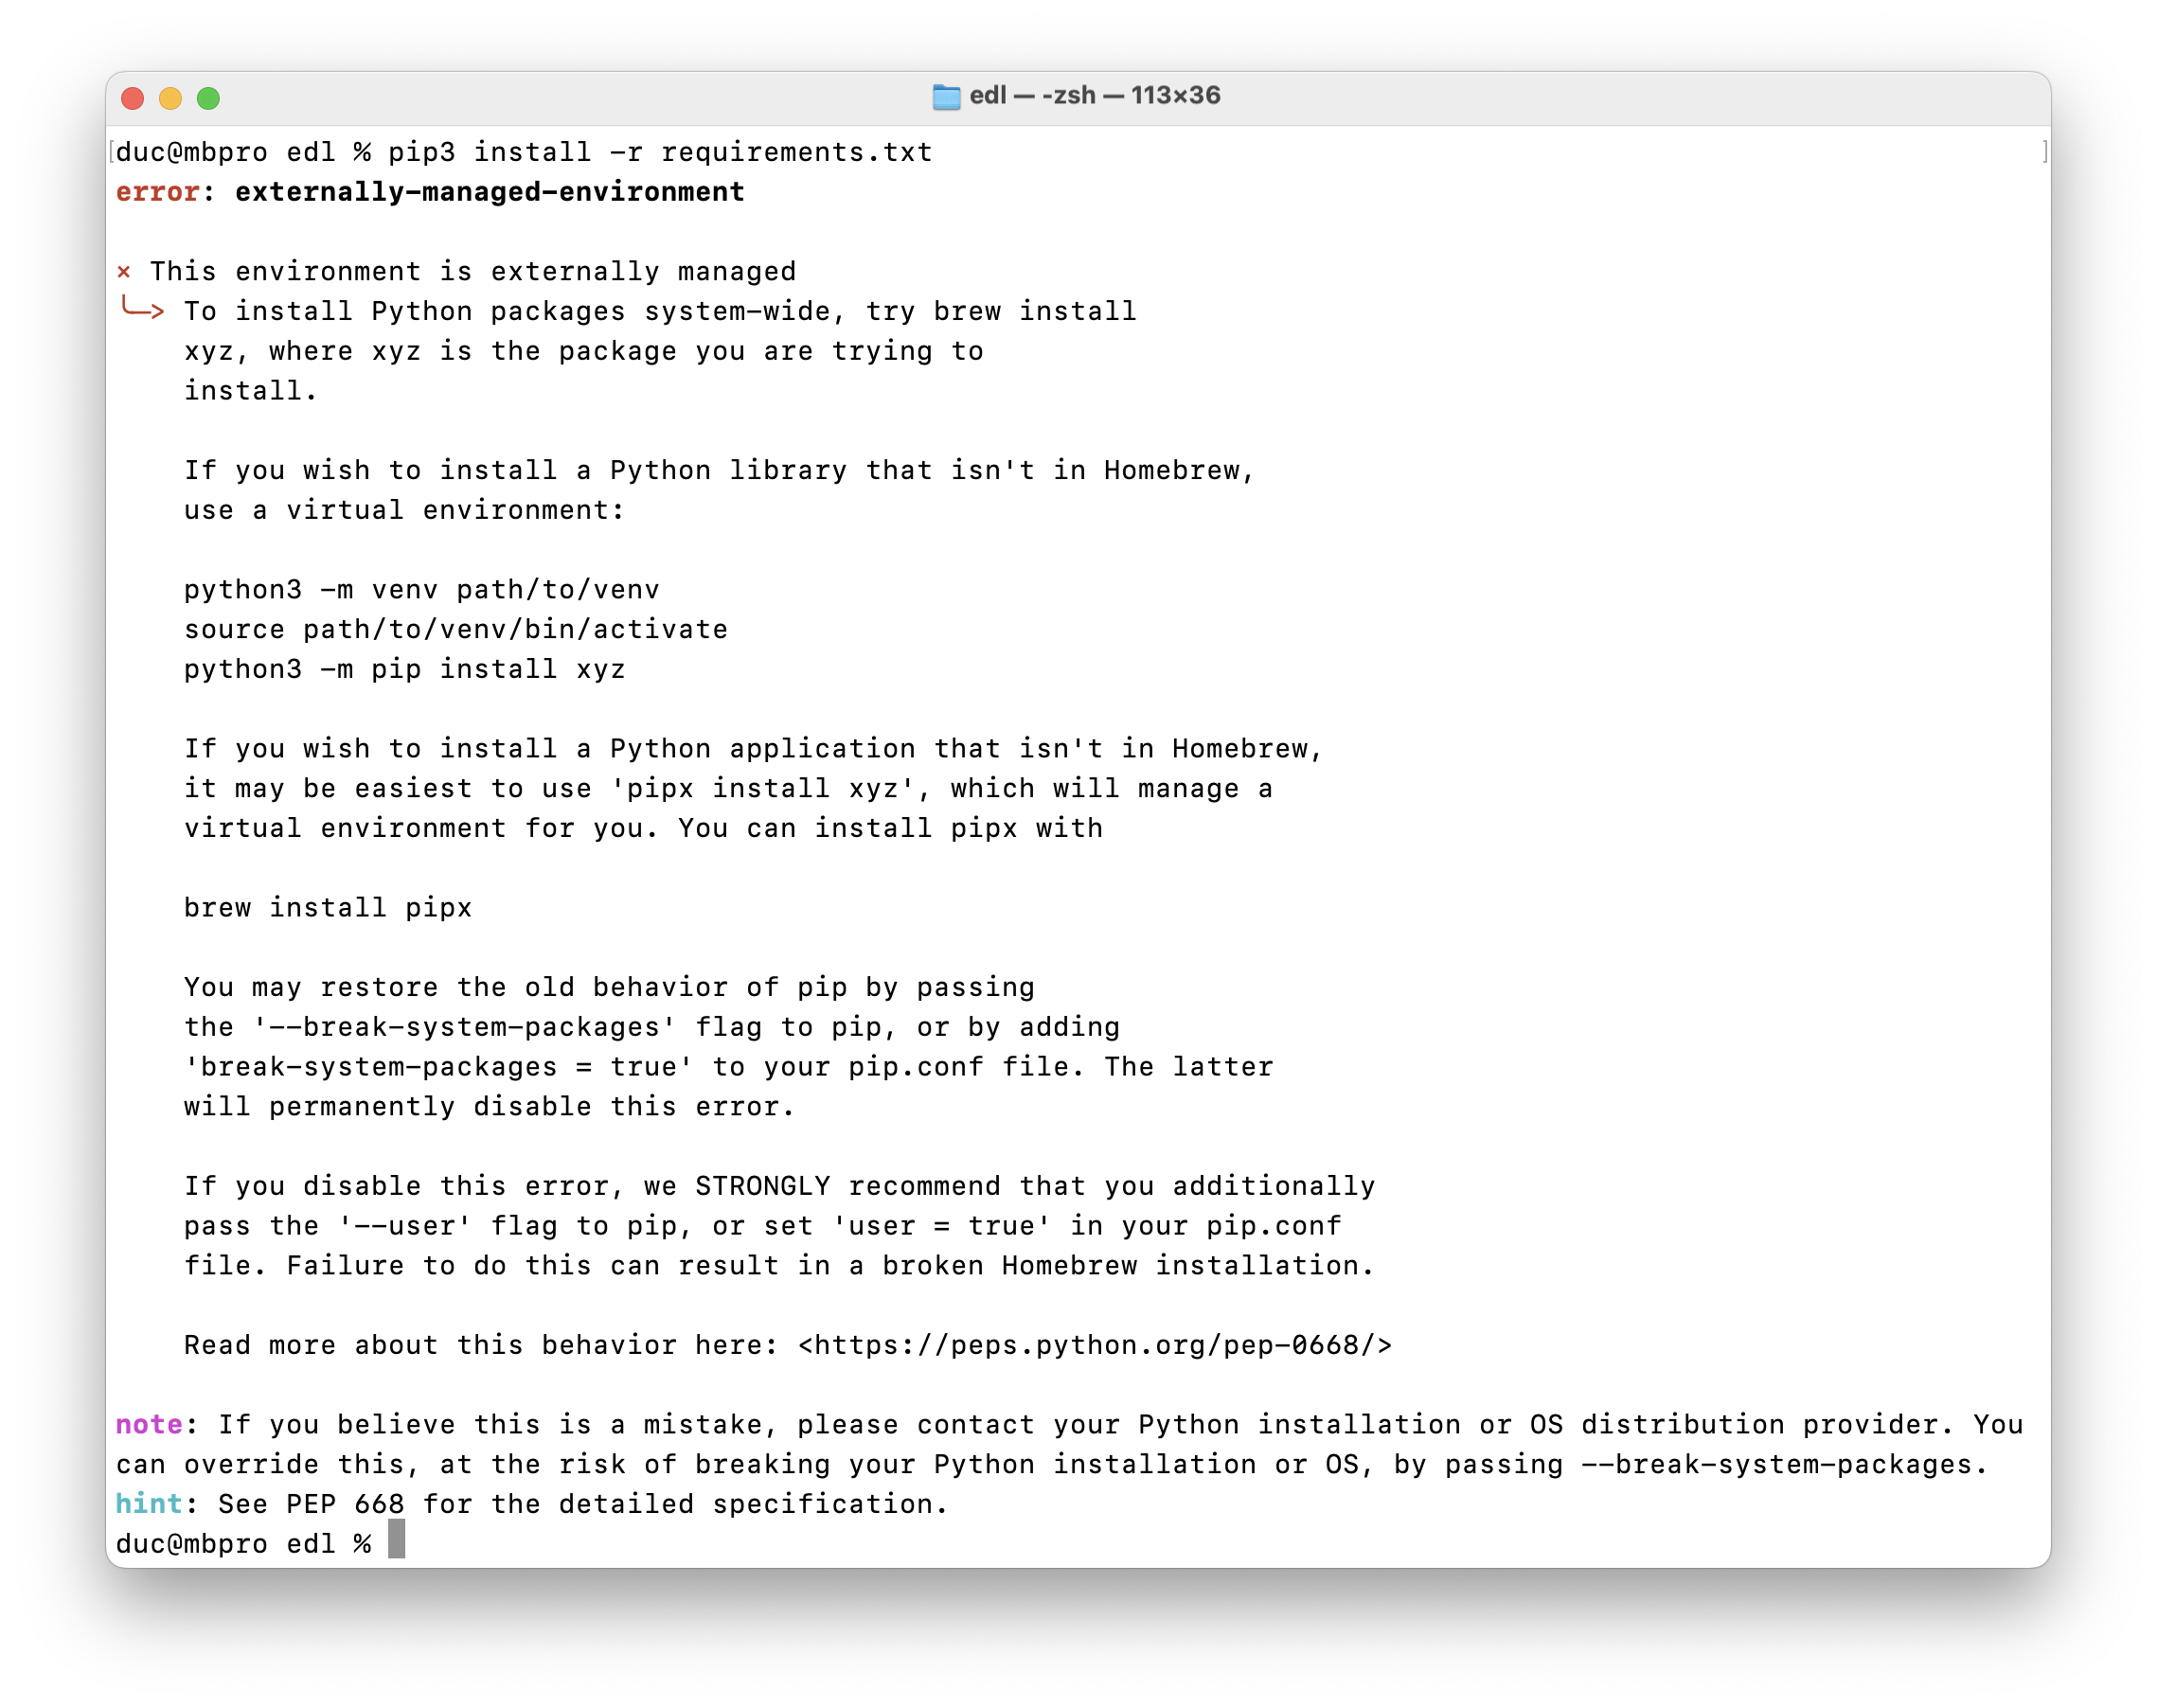
Per PEP 668, Python 3.11 and later now enforce using virtual environments to install packages with pip. If you try to install PyPI packages with pip install at this point, it will cause an externally-managed-environment error. To install the dependencies for edl.py, create a .venv directory to host a new virtual environment, then activate it:
python3 -m venv .venv && source .venv/bin/activate
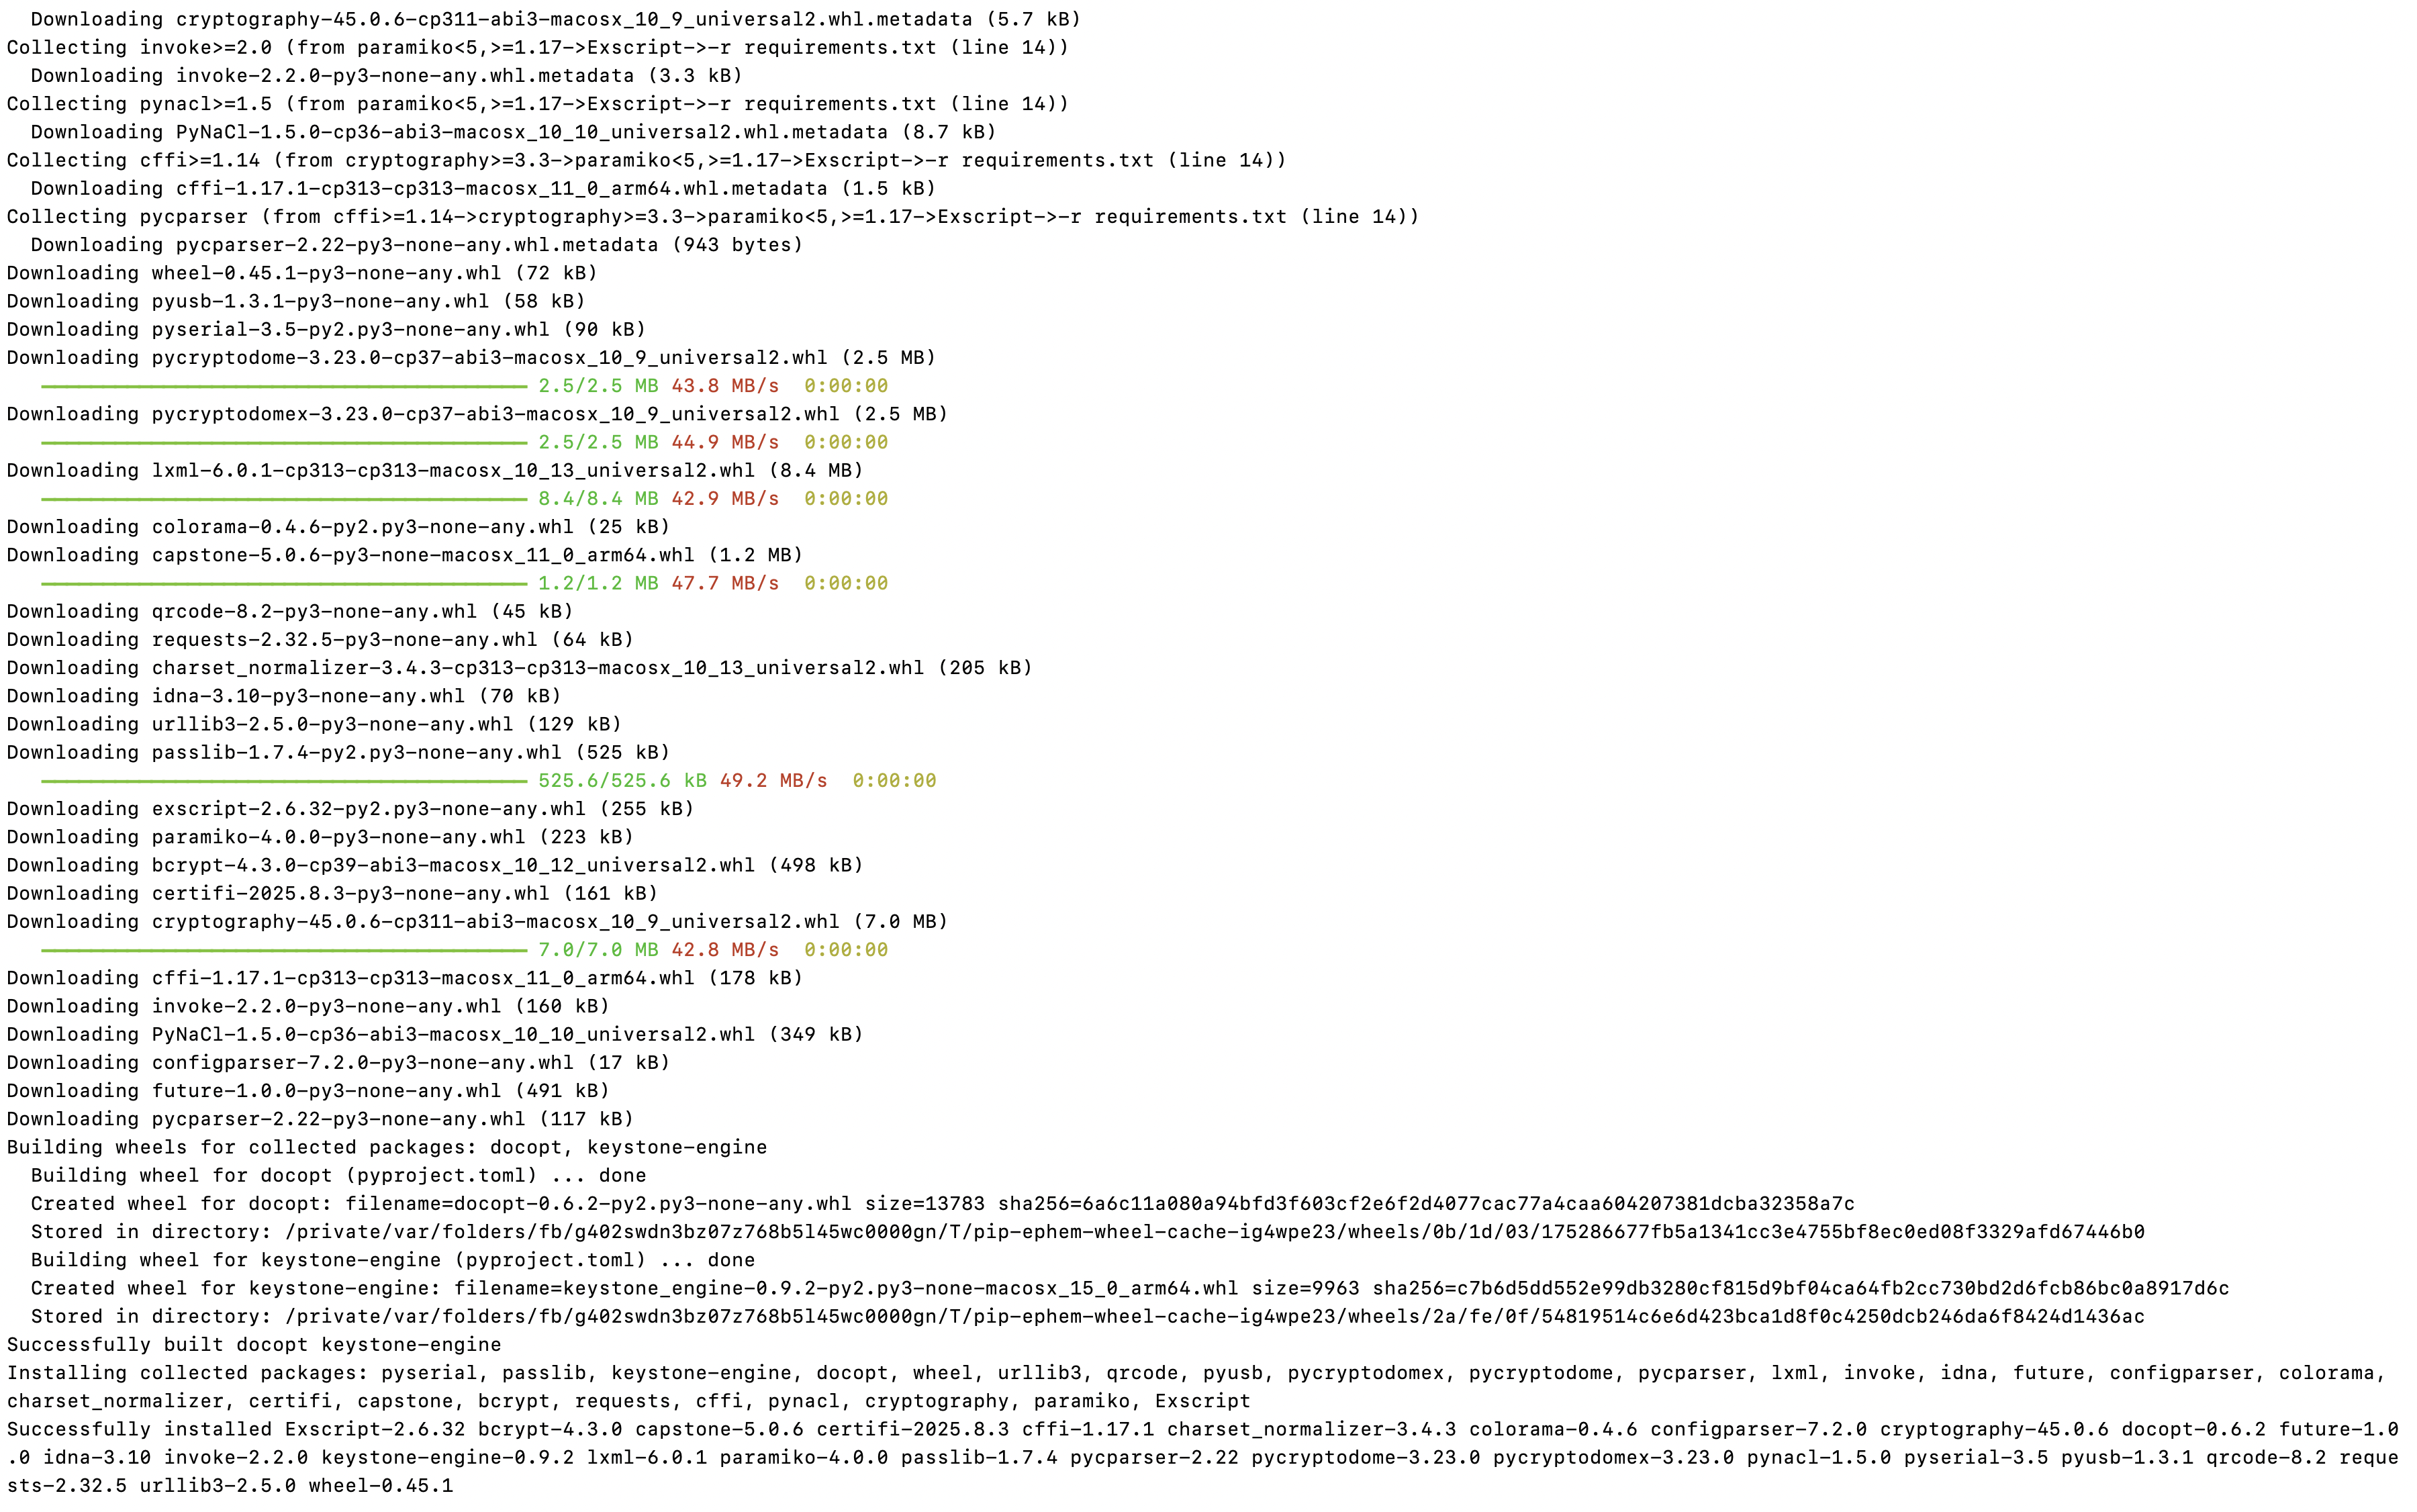
Download and install the dependencies for edl.py from PyPI, using pip:
- bkerler’s EDL:
pip3 install -r requirements.txt - andybalholm’s EDL:
pip3 install pyusb pyserial keystone-engine capstone docopt setuptools
If you were following an older revision of this guide and stuck at
ModuleNotFoundError: No module named 'distutils', starting with Python 3.12,distutils, which is a dependency of capstone, has been deprecated and removed (see Python documentation page What’s New In Python 3.10). It has now been superceded by the third-party packagesetuptools, which you can install from PyPI withpip3 install setuptools.
If you have any problems seeing your phone on Debian/Ubuntu-based distros, append blacklist qcserial in /etc/modprobe.d/blacklist.conf, and copy 51-edl.rules and 50-android.rules from the Drivers folder (root of the edl directory if you have andybalholm’s edl.py) to /etc/udev/rules.d:
# echo "blacklist qcserial" > /etc/modprobe.d/blacklist.conf && \
# cp Drivers/51-edl.rules Drivers/50-android.rules /etc/udev/rules.d
On some Linux distributions, you may need to temporarily disable ModemManager before connecting your phone. ModemManager is a tool which handles mobile broadband connections. When you connect your phone in EDL mode, it might identify the phone as a Qualcomm modem and try to configure the device, which might interfere with edl.py.
# systemctl stop ModemManager.service
# rc-service modemmanager stop
For bkerler’s edl, build and install the edl package within the virtual environment:
python3 setup.py build && sudo python3 setup.py install
Switch your phone to EDL mode and connect it to your computer. Either:
- if your phone is on, dial
*#*#33284#*#*to turn on debugging mode, and runadb reboot edlat the shell prompt; - if your phone is off, press and hold
*and#(6300 4G and 8000 4G), both volume buttons (2720 Flip, Go Flip 3/SMARTFLIP) or D-Pad Up and Down (800 Tough) at the same time while inserting the USB cable to the phone.
In both cases, the screen should flash the ‘enabled by KaiOS’ logo then become blank. This is normal behaviour letting you know your phone is in EDL mode and you can proceed.
macOS
Follow the instructions to install Homebrew on its homepage.
Download and install the Android SDK Platform Tools package, latest version of Python 3, libusb and Git formulae:
brew install python android-platform-tools libusb git
Clone/download the content of bkerler’s EDL or andybalholm’s EDL tool repository, depending on your device:
- bkerler’s EDL:
git clone https://github.com/bkerler/edl.git && cd edl && \ git submodule update --init --recursive - andybalholm’s EDL:
git clone https://github.com/andybalholm/edl.git && cd edl
Per PEP 668, Python 3.11 and later now enforce using virtual environments to install packages with pip. If you try to install PyPI packages with pip install at this point, it will cause an externally-managed-environment error. To install the dependencies for edl.py, create a .venv directory to host a new virtual environment, then activate it:
python3 -m venv .venv && source .venv/bin/activate
Download and install the dependencies for edl.py from PyPI, using pip:
- bkerler’s EDL:
pip3 install -r requirements.txt && \ pip3 install setuptools - andybalholm’s EDL:
pip3 install pyusb pyserial keystone-engine capstone docopt setuptools
For bkerler’s edl, build and install the edl package within the virtual environment:
python3 setup.py build && python3 setup.py install
Switch your phone to EDL mode and connect it to your computer. Either:
- if your phone is on, dial
*#*#33284#*#*to turn on debugging mode, and runadb reboot edlat the shell prompt; - if your phone is off, press and hold
*and#(6300 4G and 8000 4G), both volume buttons (2720 Flip, Go Flip 3/SMARTFLIP) or D-Pad Up and Down (800 Tough) at the same time while inserting the USB cable to the phone.
In both cases, the screen should flash the ‘enabled by KaiOS’ logo then become blank. This is normal behaviour letting you know your phone is in EDL mode and you can proceed.
Windows
-
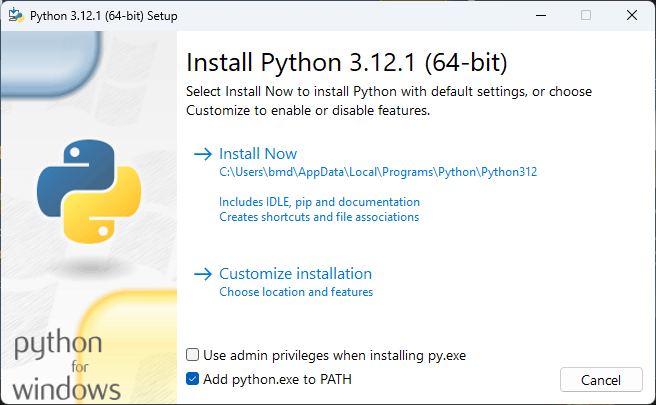
Head over to Python’s official download page for Windows and download the correct installer for your architecture (if you’re in doubt select amd64/x86_64), or download the latest version of Python from Microsoft Store.
If you’re downloading from Microsoft Store, skip to step 4.
-
Proceed with installing Python as usual. If you choose to customise your installation, include
pipand tick Add Python to environment variables. Don’t forget to tick the box next to “Add python.exe to PATH” to add Python as a global environment variable, otherwise you’ll have a hard time using Python to run scripts later on.
- On Windows 10/11, typing
pythonorpython3within Command Prompt/Windows Terminal will run the Microsoft Store version. To override this default, toggle off App Installer (python.exe) and App Installer (python3.exe) under:- Windows 10: Settings → Apps → Apps & features → App execution aliases
- Windows 11: Settings → Apps → Advanced app settings → App execution aliases
- Download and install Git so we can clone/download the EDL tool repository (default configuration is good). If you’re using Windows 10 or later and have App Installer installed, you can do so with
winget:
winget install --id Git.Git -e --source winget
- Clone/download the content of bkerler’s EDL or andybalholm’s EDL tool repository, depending on your device, then create a Python virtual environment and install the dependencies for edl.py from PyPI:
- bkerler’s EDL:
git clone https://github.com/bkerler/edl.git && cd edl && ^ git submodule update --init --recursive && ^ python3 -m venv .venv && .\.venv\Scripts\activate.bat && ^ pip3 install -r requirements.txt && ^ pip3 install setuptools - andybalholm’s EDL:
git clone https://github.com/andybalholm/edl.git && cd edl && ^
python3 -m venv .venv && .\.venv\Scripts\activate.bat && ^
pip3 install pyusb pyserial capstone keystone-engine docopt setuptools
Please see above for the explanation on why a Python virtual environment is now necessary.
- bkerler’s EDL:
- Extract the previously downloaded EDL package, open Drivers, Windows and run
Qualcomm_Diag_QD_Loader_2016_driver.exewith administrator rights. Proceed with installation and leave everything as default, restart the computer if it prompts you to do so.
- Switch your phone to EDL mode and connect it to your computer. Either:
- if your phone is on, dial
*#*#33284#*#*to turn on debugging mode, and runadb reboot edlat the shell prompt; - if your phone is off, press and hold
*and#(6300 4G and 8000 4G), both volume buttons (2720 Flip, Go Flip 3/SMARTFLIP) or D-Pad Up and Down (800 Tough) at the same time while inserting the USB cable to the phone.
In both cases, the screen should flash the ‘enabled by KaiOS’ logo then become blank. This is normal behaviour letting you know your phone is in EDL mode and you can proceed.
- if your phone is on, dial
-
To replace the installed
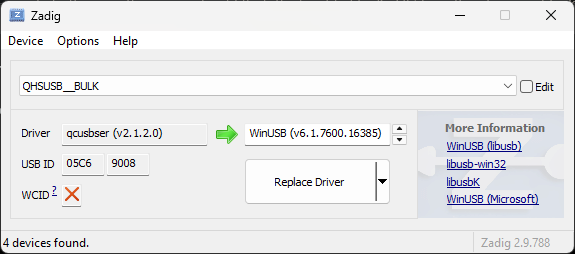
qcusbserdriver with the WinUSB (libusb) driver for use with edl.py, download and open Zadig (do NOT use the version included in the EDL package). Select Options in the menu bar, tick List All Devices and selectQHSUSB__BULK(your device in EDL mode) in the main dropdown menu.In the target driver box, to which the green arrow is pointing, click the up/down arrows until you see
WinUSB (v6.1.7600.16385)(for bkerler’s edl.py) orlibusbK (v3.2.0.0)(for andybalholm’s edl.py), then click Replace Driver.
Windows will automatically create restore points on driver installation, as Zadig suggests in its tooltip. On older computers, this might cause issues with driver configuration process being lengthened past the 5-minute mark. If Zadig aborts the process and hangs, kill Zadig with Task Manager, remove and re-insert the battery on the phone to exit and re-enter EDL mode, then try to install again. (seems to be improved with Zadig 2.9)
A previous version of this guide recommended using
libusb-win32 (v1.2.7.3)orlibusb0 (v1.2.5.0)as the target driver, both of which are later considered less reliable and may cause errors such as'usb.core.USBError: [Errno None] b'libusb0-dll:err [_usb_reap_async] timeout error\n'
- If you’re configuring the driver for the first time, an “USB Device Not Recognised” pop-up may appear. Exit EDL mode by removing and re-inserting the battery, then turn on the phone in EDL mode again.
Part 2: Obtaining the boot partition
Nokia 8000 4G and Nokia 6300 4G with bkerler’s edl.py
- Open Command Prompt/Terminal in the folder where you cloned/extracted the EDL tools. If you’re not in the Python virtual environment from part 1 or you don’t see the
(venv)at the start of the shell prompt, activate the virtual environment again.- macOS/Linux:
source .venv/bin/activate - Windows:
.\.venv\Sources\activate.bat
- macOS/Linux:
- Switch your phone to EDL mode and connect it to your computer. Either:
- if your phone is on, dial
*#*#33284#*#*to turn on debugging mode, and runadb reboot edlat the shell prompt; - if your phone is off, press and hold
*and#at the same time while inserting the USB cable to the phone.
In both cases, the screen should flash the ‘enabled by KaiOS’ logo then become blank. This is normal behaviour letting you know your phone is in EDL mode and you can proceed.
- if your phone is on, dial
- Pull the boot partition of the phone to the current directory on your computer by running:
edl r boot boot.img
Some programs, such as TranslucentFlyouts on Windows, may interfere with edl.py.
If you used
edl printgptto print the partition table, on the third command edl.py may run into error 5Input/Output Error. Exit EDL mode by removing and re-inserting the battery, then turn on the phone in EDL mode, and reconnect to your computer.
If you did it correctly, edl should be able to see your phone as running the MSM8909 (Qualcomm Snapdragon 210) chipset, pick the correct loader from the database and read your phone’s boot partition. After that, you should have a copy of the boot partition with the size of 32.0 MB (32,768 KB). Pulled boot image will be saved to the current directory.
- Reboot the phone into normal mode by running
edl resetin Command Prompt/Terminal, or remove and re-insert the battery.
Feel free to disconnect the phone from your computer for now.
Nokia 2720 Flip, Nokia 800 Tough and Alcatel Go Flip 3/SMARTFLIP with andybalholm’s edl.py
- Open Command Prompt/Terminal in the folder where you cloned/extracted the EDL tools. If you’re not in the Python virtual environment from part 1 or you don’t see the
(venv)at the start of the shell prompt, activate the virtual environment again.- macOS/Linux:
source .venv/bin/activate - Windows:
.\.venv\Sources\activate.bat
- macOS/Linux:
- Switch your phone to EDL mode and connect it to your computer. Either:
- if your phone is on, dial
*#*#33284#*#*to turn on debugging mode, and runadb reboot edlat the shell prompt; - if your phone is off, press and hold both volume buttons (2720 Flip, Go Flip 3/SMARTFLIP) or D-Pad Up and Down (800 Tough) at the same time while inserting the USB cable to the phone.
In both cases, the screen should flash the ‘Powered by KaiOS’ logo then become blank. This is normal behaviour letting you know your phone is in EDL mode and you can proceed.
- if your phone is on, dial
- Pull the boot partition of the phone to the current directory on your computer by running any of these commands, depending on which phone you have:
# Nokia 2720 Flip
python3 edl.py -r boot boot.img -loader 2720.mbn

# Nokia 800 Tough
python3 edl.py -r boot boot.img -loader 800t.mbn

# Alcatel SMARTFLIP (AT&T/Cricket)
python3 edl.py -r boot boot.img -loader Gflip3_ATT_NPRG.mbn

# Alcatel Go Flip 3 (T-Mobile/Metro by T-Mobile/Rogers)
python3 edl.py -r boot boot.img -loader Gflip3_TMO_NPRG.mbn
You should now have a copy of the boot partition with the size of 25.0 MB (25,600 KB).
- Once finished, reboot the phone into normal mode by typing
python edl.py -resetinto the shell prompt, or remove and re-insert the battery.
Feel free to disconnect the phone from your computer for now.
Copy and keep the original boot partition somewhere safe in case you need to restore the phone to the original state to apply incremental over-the-air updates or re-enable WhatsApp calls.
Part 3: Patching the boot partition
Automatic patching with 8k-boot-patcher
- Download and install Docker Desktop. Once set up, open the program, click Accept on the Docker Subscription Service Agreement box and let the Docker Engine start before exiting.

- Use Git to clone/download the boot patcher toolkit by running this in Command Prompt/Terminal. This will download the toolkit and have Docker set it up. Do not omit the dot/period at the end of this command, this tells Docker where our downloaded toolkit are located on the system.
git clone https://gitlab.com/suborg/8k-boot-patcher.git && cd 8k-boot-patcher && docker build -t 8kbootpatcher .

- Copy the boot.img file you just pulled from your phone to the desktop and do NOT change its name. Execute this command in Command Prompt/Terminal to run the patching process:
- Windows:
docker run --rm -it -v %cd%/Desktop:/image 8kbootpatcher - macOS/Linux:
docker run --rm -it -v ~/Desktop:/image 8kbootpatcher
- Windows:
$ docker run --rm -it -v ~/Desktop:/image 8kbootpatcher
Boot image found, patching...
writing boot image config in bootimg.cfg
extracting kernel in zImage
extracting ramdisk in initrd.img
charger
data
[...]
ueventd.qcom.rc
ueventd.rc
verity_key
4037 blocks
4979 blocks
reading config file bootimg.cfg
reading ramdisk from myinitrd.img
Writing Boot Image boot.img
Boot image patched!
That’s it! On your desktop there will be two new image files, the modified boot.img and the original boot-orig.img.
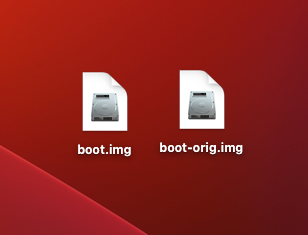
You can now head to part 4.
Manual patching with Android Image Kitchen
- Extract the Android Image Kitchen package and copy the boot image you just pulled over to the root of the extracted folder.

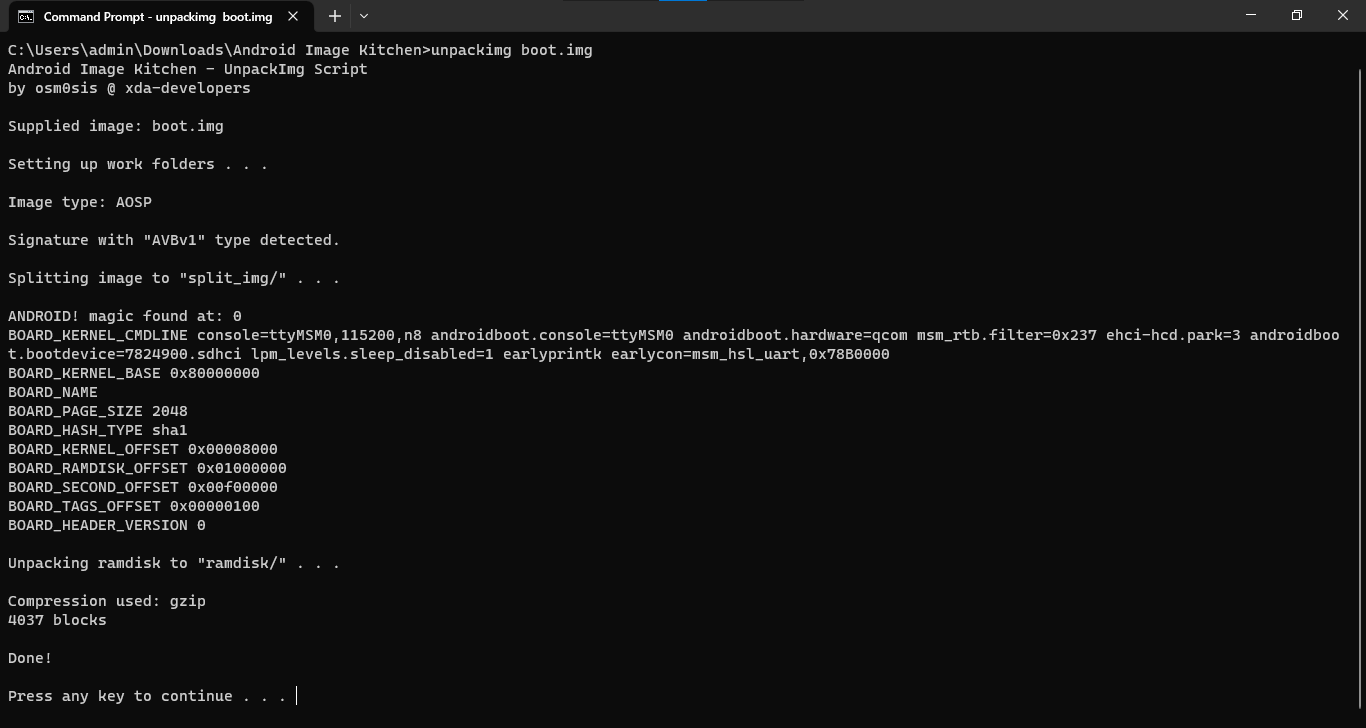
- Open the folder in Command Prompt/Terminal and run
unpackimg boot.img. This will split the image file and unpack the ramdisk to their subdirectories.
Be sure to edit the files correctly, else the phone won’t boot!
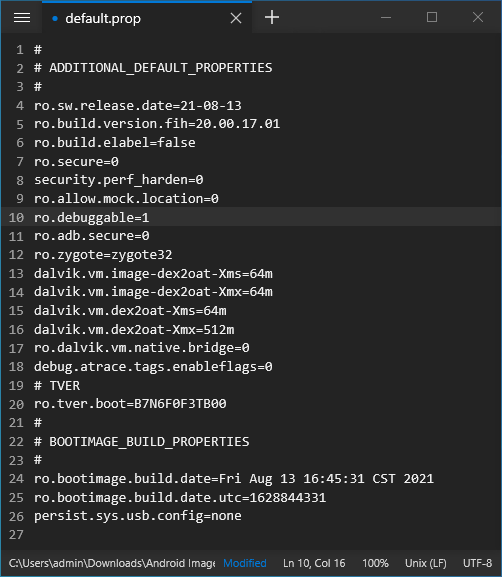
- Let the editing begin! First, open
ramdisk/default.propusing Notepad++ and change:- line 7:
ro.secure=1→ro.secure=0 - line 8:
security.perf_harden=1→security.perf_harden=0 - line 10:
ro.debuggable=0→ro.debuggable=1
- line 7:
@@ -4,9 +4,9 @@
  ro.sw.release.date=21-08-13
  ro.build.version.fih=20.00.17.01
  ro.build.elabel=false
- ro.secure=1
- security.perf_harden=1
+ ro.secure=0
+ security.perf_harden=0
  ro.allow.mock.location=0
- ro.debuggable=0
+ ro.debuggable=1
  ro.adb.secure=0
  ro.zygote=zygote32
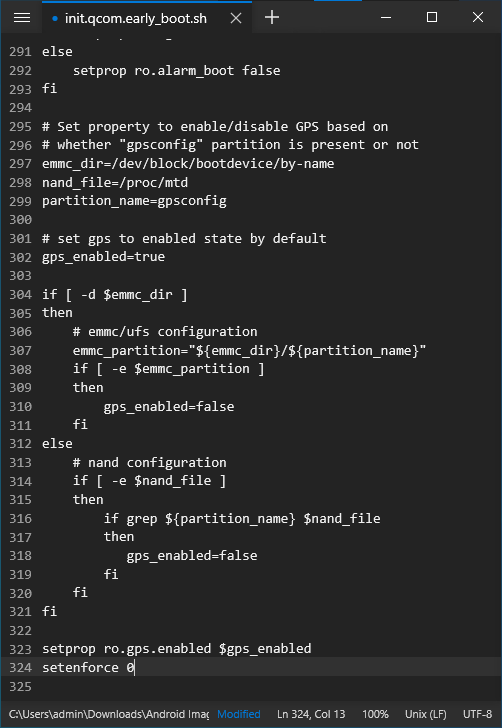
- Open
ramdisk/init.qcom.early_boot.shin Notepad++ and addsetenforce 0as a new line at the end of the file.
@@ -312,14 +312,14 @@
  else
      # nand configuration
      if [ -e $nand_file ]
      then
          if grep ${partition_name} $nand_file
          then
              gps_enabled=false
          fi
      fi
  fi

  setprop ro.gps.enabled $gps_enabled
+ setenforce 0
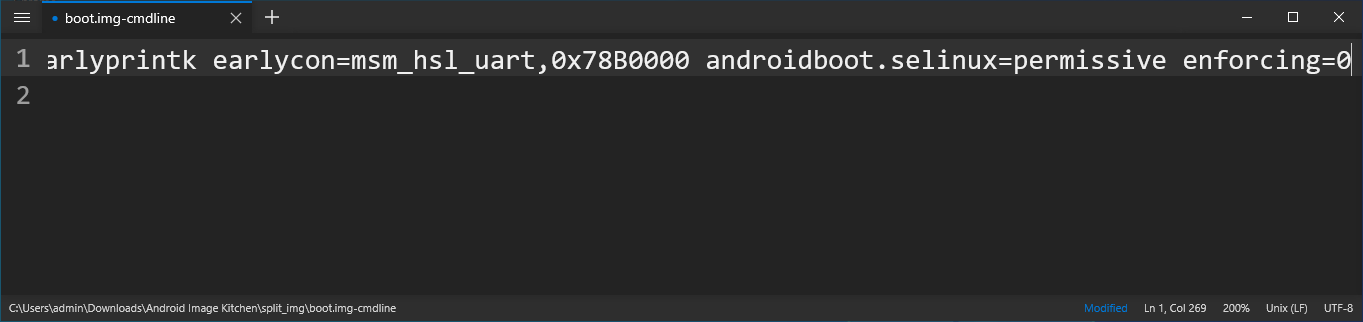
- Go back to the Android Image Kitchen folder and open
split_img/boot.img-cmdlinein Notepad++. Without adding a new line, scroll to the end of the first line and appendandroidboot.selinux=permissive enforcing=0.
- Open
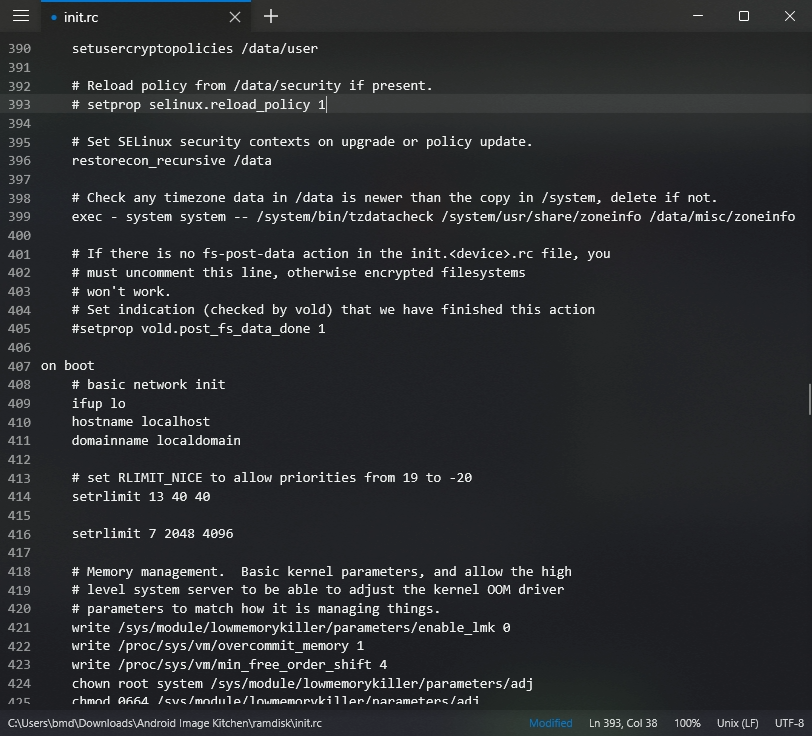
ramdisk/init.rc(NOTramdisk/init) and delete line 393setprop selinux.reload_policy 1or mark a comment as shown, which will ultimately prevent SELinux from overwriting the policy changes we made above.
@@ -390,7 +390,6 @@
  setusercryptopolicies /data/user

  # Reload policy from /data/security if present.
- setprop selinux.reload_policy 1

  # Set SELinux security contexts on upgrade or policy update.
  restorecon_recursive /data
@@ -418,9 +418,10 @@
  # Memory management.  Basic kernel parameters, and allow the high
  # level system server to be able to adjust the kernel OOM driver
  # parameters to match how it is managing things.
+ write /sys/module/lowmemorykiller/parameters/enable_lmk 0
  write /proc/sys/vm/overcommit_memory 1
  write /proc/sys/vm/min_free_order_shift 4
  chown root system /sys/module/lowmemorykiller/parameters/adj
  chmod 0664 /sys/module/lowmemorykiller/parameters/adj
  chown root system /sys/module/lowmemorykiller/parameters/minfree
  chmod 0664 /sys/module/lowmemorykiller/parameters/minfree
- And that’s a wrap! Open the Android Image Kitchen folder in Command Prompt/Terminal and run
repackimgto package your modified boot partition.
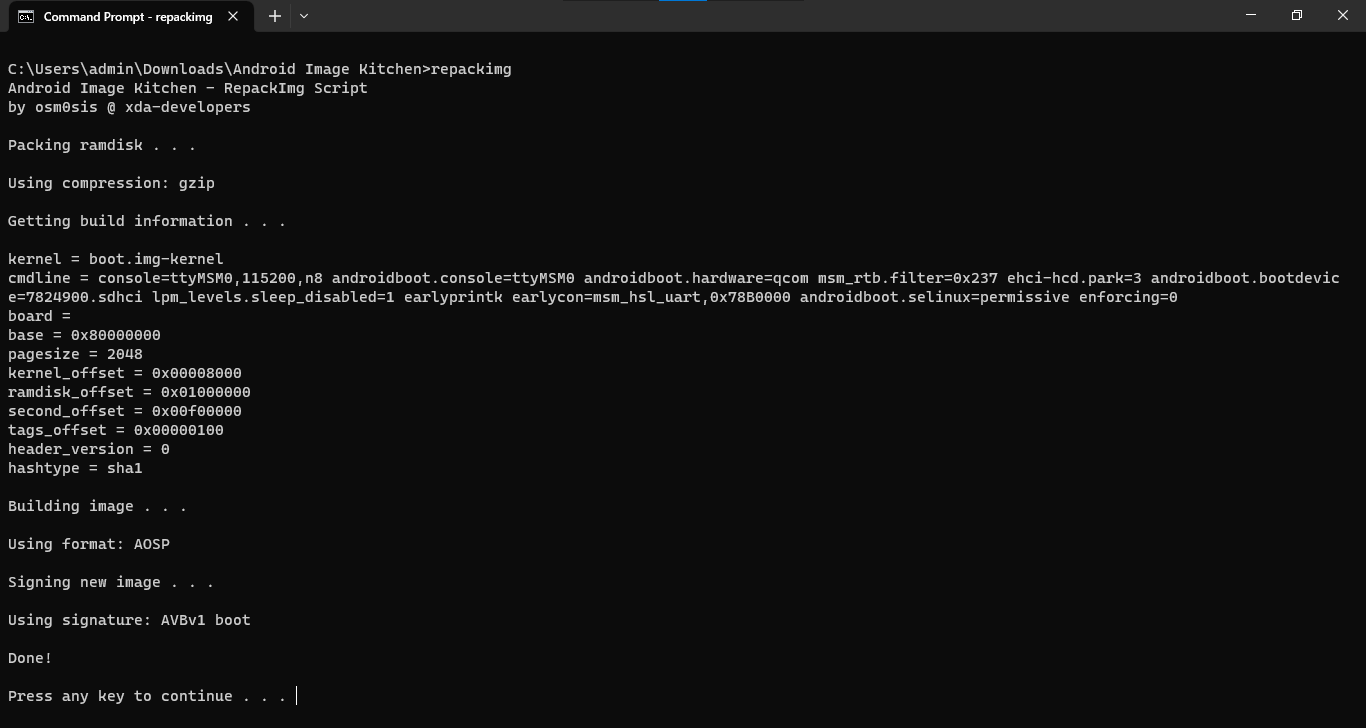
If you happen to encounter an error during the signing process, that’s likely because the process uses java to power the boot-signer.jar sequence and you don’t have it installed. The image will still be packaged and ready for flashing, but if you’re a perfectionist, you can install JRE and try again.
If the new image is barely over 1/3 the size of the original image, it’s normal and you can proceed.
Part 4: Flashing the modified boot partition
- Open Command Prompt/Terminal in the folder where you cloned/extracted the EDL tools. If you’re not in the Python virtual environment from part 1 or you don’t see the
(venv)at the start of the shell prompt, activate the virtual environment again.- macOS/Linux:
source .venv/bin/activate - Windows:
.\.venv\Sources\activate.bat
- macOS/Linux:
- Switch your phone to EDL mode and connect it to your computer. Either:
- if your phone is on, dial
*#*#33284#*#*to turn on debugging mode, and runadb reboot edlat the shell prompt; - if your phone is off, press and hold
*and#(6300 4G and 8000 4G), both volume buttons (2720 Flip, Go Flip 3/SMARTFLIP) or D-Pad Up and Down (800 Tough) at the same time while inserting the USB cable to the phone.
In both cases, the screen should flash the ‘enabled by KaiOS’ logo then become blank. This is normal behaviour letting you know your phone is in EDL mode and you can proceed.
- if your phone is on, dial
- Move the newly created boot.img, unsigned-new.img or image-new.img to the EDL folder. From here type any of these commands depending on which image file you have:
edl w boot boot.img
edl w boot unsigned-new.img
edl w boot image-new.img
For the Nokia 2720 Flip, Nokia 800 Tough and Alcatel Go Flip 3/SMARTFLIP with andybalholm’s EDL:
python3 edl.py -w boot boot.img -loader 2720.mbn
python3 edl.py -w boot boot.img -loader 800t.mbn
python3 edl.py -w boot boot.img -loader Gflip3_ATT_NPRG.mbn
python3 edl.py -w boot boot.img -loader Gflip3_TMO_NPRG.mbn
- Restart the phone to normal mode by typing
edl resetorpython3 edl.py -reset. And we’re done!
Next steps
- Now that you’ve rooted your phone, to install apps with ‘forbidden’ permissions, connect your phone to a WebIDE session, open Device Preferences in the right pane, clear the value of
devtools.apps.forbidden-permissions, then restart B2G by either reboot the phone or hold the top Power button and select Memory Cleaner, Deep Clean Memory.

- If you wish to retain privileged permissions after restoring the phone to its unrooted state, before doing so, back up all data, sideload Luxferre’s CrossTweak then press # to perform a privileged factory reset; this will wipe all data of the phone and let you set up with a privileged user session. This session will last until an OTA update overrides or when you choose to factory reset the phone.
If you wish to revert all changes you’ve made, connect your phone to the computer in EDL mode, move the original boot image file to the extracted EDL tool folder, open Command Prompt/Terminal and type:
edl.py w boot boot.img && \
edl reset
python3 edl.py -w boot boot.img -loader 2720.mbn
python3 edl.py reset